Tuesday 21 June 2011

White chocolate & raspberry birthday cake


I made this cake for my friend Alex' 21st Birthday Party!
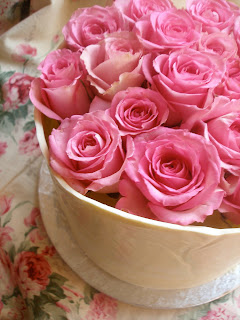
It took a few hours to make the white chocolate shell around the cake, but I think it was worth it - I hate to sound arrogant, but I think it's one of the prettiest cakes I've seen in a while!
The sponge is a good old Delia Smith all-in-one-sponge classic & the icing is a white chocolate version of my usual chocolate buttercream frosting from Joy of Baking.

Vanilla Sponge
175g self-raising flour
1 tsp baking powder
3 large eggs
175g caster sugar
175g softened butter
1/2 tsp vanilla extract

Take a very large mixing bowl. Measure the flour and baking powder into a sieve and sift into a bowl, holding the sieve quite high to give the flour a good airing as it goes down. Now all you do is simply add all the other sponge ingredients to the bowl and, provided the butter is really soft, you just go in with an electric hand whisk and whisk everything together until you have a smooth, well-combined mixture. This will take 1 minute but, if you don't have an electric hand whisk, you can use a wooden spoon with a bit more effort. 


What you now end up with is a mixture that drops easily off a spoon when you give it a tap on the side of the bowl. If it does seem a little too stiff, add 1-2 tablespoons of tap water and mix again.Now divide the mixture between the two tins, level it out and place on the centre shelf of the oven. It will take 30-35 minutes to cook – don't open the oven door until 30 minutes have elapsed. 

To test if they are cooked or not, touch the centre lightly with your little finger; if it leaves no impression and springs back, the sponge is cooked. 

Next, remove them from the oven then wait for about 5 minutes before turning them out on to a wire cooling rack. Carefully peel off the base papers, leave the sponges to get completely cold.

White chocolate buttercream icing
120g white chocolate 
(I grated mine as it takes less time to melt, which equal less chance of the chocolate becoming burnt & turning gritty.)
150g unsalted softened butter
160g sifted icing sugar

Beat the icing sugar & butter until pale and fluffy.
Meanwhile melt the chocolate gently over a pan of hot water.
Once the chocolate has melted beat into the butter & sugar mixture until smooth.

I doubled both the cake batter & icing recipe to make my cake.  
I had two layers of raspberry jam filling & one layer of white chocolate buttercream in my cake.  
I then covered the rest of the cake in the remaining frosting & left to cook in the fridge.

To make the chocolate shell, i melted about 300g of white chocolate & spread it onto a large piece of tin foil (which was long enough to fit around the edge of the cake, with a little overlap)
Once the chocolate had nearly set I wrapped it around the cake and left in a cool place to set.


Red Velvet cupcakes

This recipe cannot be beaten - the BEST red velvet cakes you will ever eat!
Recipe from The Hummingbird Bakery by Tarek Malouf

60g unsalted softened butter
150g caster sugar
1 egg
20g cocoa powder
40ml red food colouring
1/2 tsp vanilla extract
120ml buttermilk
150g plain flour
1/2 tsp bicarbonate of soda
1 1/2 tsp white wine vinegar

cream cheese frosting
300g icing sugar, sifted
50g unsalted softened butter 
125g cold cream cheese

Preheat the oven to 170oC

Put the butter & sugar in a freestanding electric mixer with a paddle attachment (or use a handheld electric whisk) and beat on medium speed until light and fluffy and well mixed.  Turn the mixer up to high speed, slowly ass the egg and beat until everything is well incorporated.

In a separate bowl, mix together the cocoa powder, red food colouring & vanilla extract to make a very thick, dark paste.  Add to the butter mixture and mix thoroughly until evenly combined and coloured. (scrape and unmixed ingredients from the side of the bowl with a rubber spatula).  Turn the mixer down to slow speed and slowly pour in half the buttermilk.

Beat until well mixed, then ass half the flour & beat until everything is well incorporated.  Repeat this process until all the buttermilk and flour have been added.
Scrape down the side of the bowl again.
Turn the mixer up to high speed and beat until you have a smooth, even mixture.  Turn the mixture down to low speed and add the bicarbonate of soda and vinegar.  Beat until well mixed, then turn up the speed again and beat for a couple more minutes.

Meanwhile, make the frosting by beating the icing sugar & butter together using an electric whisk, on a medium-slow speed until the mixture comes together.  Add the cream cheese in one go and beat until it is completely incorporated.  Turn up the mixer to medium-high speed  & continue beating until the frosting is light & fluffy, at least five minutes.  Do not overbeat, as it can quickly become runny.

Spoon the mixture into paper cases until two-thirds full & bake in the oven until the sponge bounces back when touched (how long this make take depends on the size of your muffin cases!)
 Leave cakes to cool & then ice.

To make a red velvet cake double the quantities of cake batter & icing & divide between three 20-cm cake tins.  Bake for 25 minuets each in the same oven temperature. 

Monday 20 June 2011

Cinnamon & Cardamon Buns

The cardamom in the dough makes these buns far more sophisticated .....
The recipe is taken from Falling Cloudberries by Tessa kiros.

Makes about 35 buns

bun dough
250ml tepid milk
100g caster sugar
25g fresh yeast (you can get this from a decent bakery)
1 egg
125g softened butter
2 teaspoons of ground cardamom
1 teaspoon of salt
650g plain flour

cinnamon butter
2 teaspoon of ground cinnamon
50g caster sugar, plus 1 tablespoon for sprinkling
80g softened butter
1 egg

Put the milk & sugar in a bowl and crumble in the yeast.  Leave for 10 minutes, or until the yeast begins to activate.  Add the egg, butter, cardamom & salt & mix in.  Add the flour, bit by bit, mixing in with a wooden spoon until you need to use your hands, and then turn it out onto the work surface to knead.  It may seem a little too sticky initially, but will become compact and beautifully soft after about 5 minutes.  Put the dough back in the bowl, cover with a clean cloth & then a heavy towel or blanket, & leave in a warm place for about 2 hours, or until doubled in size.

To make the cinnamon butter, mix together the cinnamon & sugar.  Divide the butter into four portions and keep on one side.

Put the dough on a floured work surface & divide into four portions.  Begin with one portion, covering the others with a cloth so they don't dry out.  Using a rolling pin, roll out a rectangle, roughly about 30 x 25cm & 2-3mm thick.  Spread one portion of butter over the surface of the dough with a palette knife or blunt knife.  Sprinkle with about 3 teaspoons of the cinnamon mix, covering the whole surface with quick shaking movements of your wrists.  Roll up the dough to make a long sausage.  Set aside while you finish rolling out and buttering the rest of the dough, so that you can cut them all together.

Grease some large round cake tins & cut the dough sausages into 3cm slices.
Turn the dough slices up in the cake tins so their cinnamon centers are facing upwards. Arrange the dough circles in a round circle next to one another (don't squash them in too tightly as the will rise when they are cooking). 
Brush the dough with the beaten egg & sprinkle with the remaining sugar.

Leave to rise for half an hour & preheat your oven to 180oC.  Bake them for about 40 minutes or until they are golden on top.  Once they are cooked you can take them out of the tin & they should all hold together in a round shape.  You can also test if they are properly cooked underneath by taking them out of the tin.  If the underneath still feels doughy, put back into the oven until fully cooked.


I iced my buns with a mixture of icing sugar, milk & a tablespoon of cream cheese.
Beat all the ingredients together until smooth & pour over the cooled buns.